It is a little early to be talking about cherries in the UK… a few months early… but it is exciting to see cherries ready on the trees. We might even get some this year instead of the birds. They have already done an excellent job of eating the cherry and plum tree leaves – I had no idea they were that tasty…
We were given a bag of cherries from a friend who takes the left overs from a market for her chickens and gives us a huge portion of it to feed little piggy and chooks. Some were on the turn, queue cherry baking time.
I’ve got a favourite cherry cake recipe (find it here Cherries) but I was lacking in some ingredients and, to be honest, I wanted chocolate cake 😛
So I trawled the internet to find a chocolate one that had the ingredients we had in the house. I had just enough to make one from https://www.kitchensanctuary.com
It is most definitely not my own creation even though I would love to take credit for it, but it is so delicious that I think the word should be spread. It is a new favourite chocolate cake.
Flourless with ground almonds, fresh cherries, chocolate chunks in a chocolate cake, lovely gooey texture – what is not to like?!
Chocolate Chunk Cherry Cake
(Serves 10)
-225g butter, softened -200g granulated sugar -1tsp vanilla extract -4 eggs -200g ground almonds -50g cocoa powder -1tsp baking powder -100g dark chocolate -100g dark or milk chocolate cut into chunks -200g fresh cherries
Preheat oven to 170C. Line a 20cm/9inch deep cake tin with baking parchment.
In a large bowl, beat together the softened butter and the sugar until light and fluffy.
Mix in the vanilla extract and the eggs one at a time until well incorporated into the mixture.
Stir in the ground almonds, cocoa powder and baking powder, mixing well to combine.
Melt 100g of dark chocolate in a heatproof bowl over the hob or in a microwave. Mix into the cake mixture followed by the chunks of unmelted chocolate.
Scrape the contents of the bowl into the prepared baking tin.
Remove the stems from the cherries and cut them open, removing the stones from the centre. Scatter the cherries over the top of the cake’s surface.
Bake in the centre of the oven for about 50 minutes or until a skewer inserted into the centre comes out clean. Leave to cool in the tin before transferring to the wire rack to cool completely. It is also delicious served warm.
When completely cold, store in an airtight container for up to three days.
-225g granulated sugar -2tbsp lemon juice -180g plain flour -2tsp baking powder -Pinch of salt – 1/2 cup of milk -1/2tsp vanilla essence -3 large eggs -1tbsp lemon juice -1/2 cup vegetable oil -300g blueberries -1/4tsp plain flour
Preheat the oven to 180C. Line a 20cm/9inch deep circular baking tin with baking parchment.
Mix the sugar and the lemon juice together. Mix in the flour, baking powder and salt.
Mix in the milk along with the vanilla essence. Then mix in the eggs, followed by the lemon juice and the vegetable oil.
When it has mixed well, add the blueberries with the 1/4tsp of plain flour and gently mix in.
Scrape into the baking tin and bake in the centre of the oven for approximately 1hr or until a skewer inserted into the centre comes out clean.
Leave on a wire rack to cool in the tin before turning out the cake onto the wire rack to cool completely. Store in an airtight container in the refrigerator.
Sorry this is so late – I promised it ages ago when the apples were in high season, but uni essays had to take priority!
So, apple and cinnamon – a good mix.
This is a little autumnal treat. Eat it on its own or serve with a nice hot pudding. What about a winter crumble with apple and cinnamon ice cream on the side?
Enjoy!
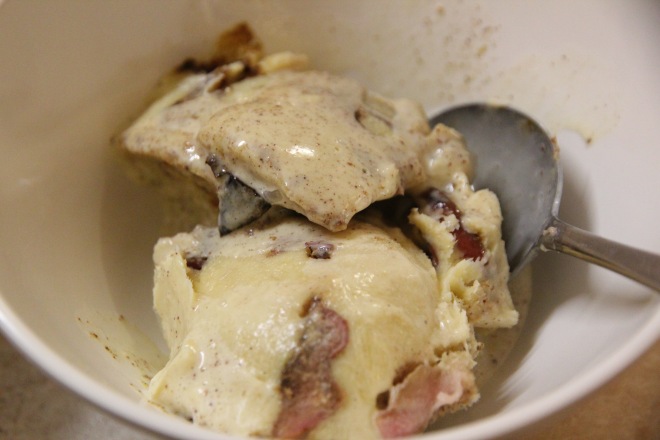
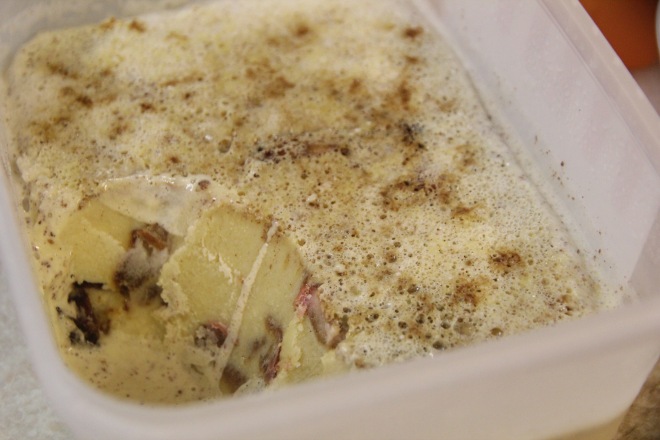
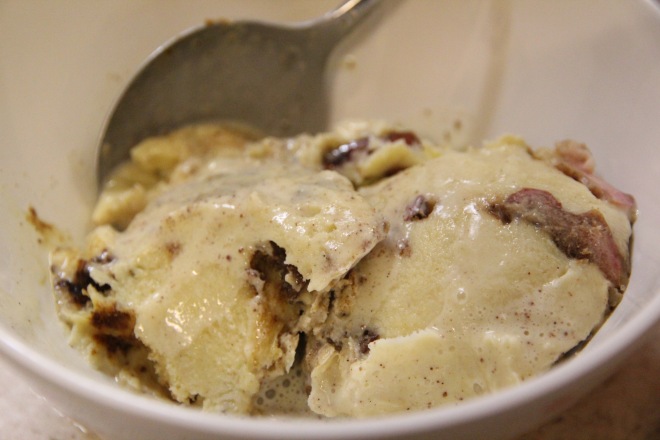
Apple and Cinnamon Ice Cream
(1L ice cream container)
-1 cup whole milk -3/4 cup granulated sugar -2 cups double cream -6 egg yolks -2tsp ground cinnamon
-2tbsp butter -2 large apples, cored and diced into chunks -1/4 cup dark brown sugar -1tsp ground cinnamon -1/4tsp ground nutmeg
To make the ice cream base: in a large pan, add the milk, 1/4 of the sugar and the cream. Bring just to the boil.
In a large bowl, mix the rest of the sugar and the egg yolks together. Carefully pour in the heated milk mixture and start to whisk it in.
Once combined, mix in the ground cinnamon thoroughly.
To make the apple compote: melt the butter in a non-stick pan. In a bowl, toss the apple with the brown sugar and spices. Tip into the pan and heat, stirring often, until the apple is tender and the sugar has melted. This should take a couple of minutes. Remove from the heat and allow to cool.
If using an ice cream machine, follow the manufacturers instructions. If making it by hand, pour the ice cream base into a large ice cream container. Scrape in the cooled apple mixture and stir in, using figure of eight movements. Seal and place in the freezer. Every half an hour, remove and repeat the same figure of eight swirls. Continue until the ice cream has set. Serve.
Harvested our first sweetcorn of 2018 yesterday, and I think it is our best yet.
Fully grown, yellow kernels, picked just at the right time. Not tough and old, but completely tender and sweet.
We grew our usual Swift F1 seeds this year. We started them off in tall yoghurt pots of compost indoors in May. Once they were big enough to handle and the frosts were over, we planted them outdoors into fertilised earth in direct sunlight. With the glorious sun in June and July along with a vigorous watering schedule, the actual sweetcorn plants grew huge, are tallest yet, going past my 5’3 at least.
Sweetcorn are pollinated by wind rather than insects. You want to get the dust from the tops of the plant onto the tassels below that will become the sweetcorn if pollinated. I did a lot of hand pollinating this year, due to the lack of wind, and thank goodness it seemed to work!
To check if the sweetcorn is ready to harvest, you wait until the tassels have become dark brown instead of white, basically died back. You then gently peel apart the green skin of the corn and insert a finger nail into one of the kernels – if the liquid comes out milky white, it is ready. If not, leave it for a couple of days before checking again.
Now this is important: harvest your sweetcorn only the you are about to cook it. As soon as you take that cob off the plant, its sugar starch degenerates rapidly, straight away. This means the taste of the cob decreases in yumminess very, very quickly. You are advised to bring a large pan of water to the boil before you pick your cob!
Perfect cob! Cooked and put in the bowl in readiness for kernel removal…
To cook the cob, remove the green outer leaves and tassels. Plop the whole cob into the boiling water and leave to boil for a couple of minutes. Remove and put to one side to cool. You can either serve sweetcorn whole as corn on the cob with some butter, or, standing the corn in a large bowl, using a knife, cut down the sides of the cob, scraping the kernels off. You can then serve the sweetcorn kernels without the cob or you can freeze them like this in plastic bags, as they will take up less space in your fridge. Cooking and freezing locks in the sugar starch and preserves the taste and goodness of the sweetcorn.
Voila!
Sweetcorn kernels scraped off and served for lunch.
Does anyone else think of Pocahontas when they see sweetcorn with the green leaves still on?
‘Just around the river bend…’
That film’s got sot some cracking good songs.
Other fun news: made tomato passata last week and last night I used it to make homemade pizza.
That means that our dinner used homegrown onion, garlic, perpetual leaf spinach, oregano and tomatoes!
Shame the mozzarella and cheddar, olive oil and bread flour or yeast weren’t home produced… but at least the pizza base was homemade!
But it is getting tricky to get the courage up enough to venture out into the heat trap in the veg garden to pick the fruit.
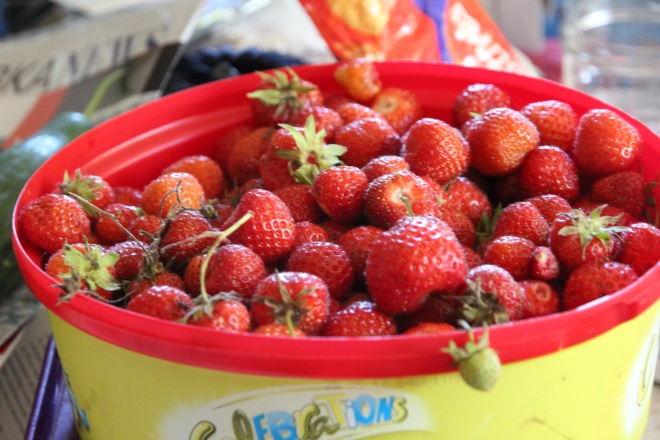
Someone told me this has been a really good year for strawberries, all due to the time the rain fell this winter (which I thought was all the time. Incessantly. Non-stop). It has certainly been a good strawberry year for us. I’ve been eating them all the time for last couple of weeks.
On top of the strawberries, the raspberries have taken off, along with the red currants, boysenberries, jostaberries and the blackcurrants. I think I almost had a breakdown end of last week due to the overwhelming amount that needed to be picked.
This blurry photograph is of 45 minutes picking of just strawberries. I didn’t even get half way through the patch, and I have eaten a few handfuls from the container already…
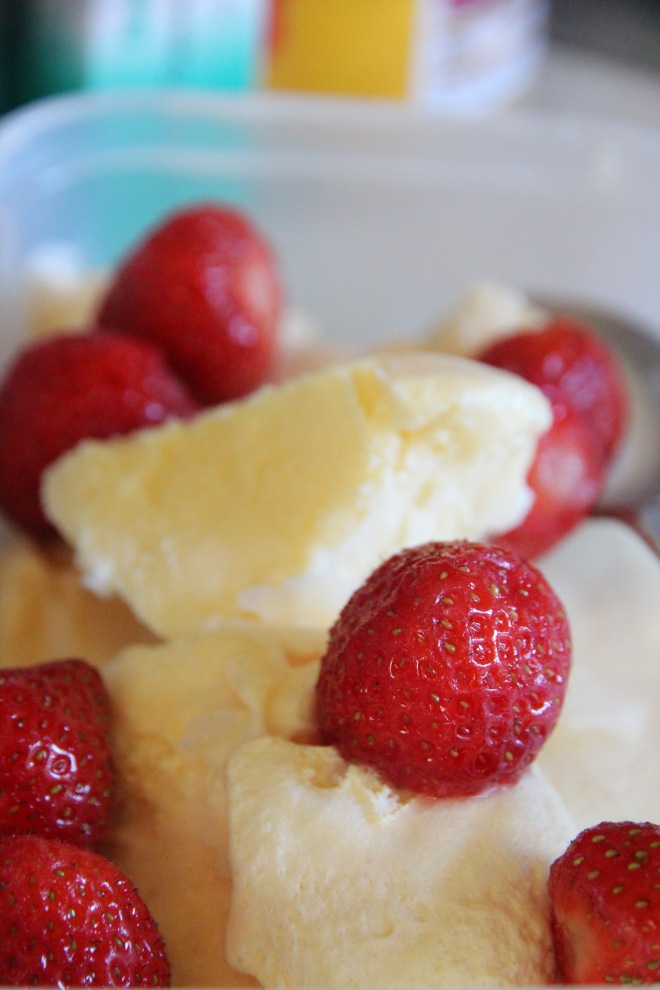
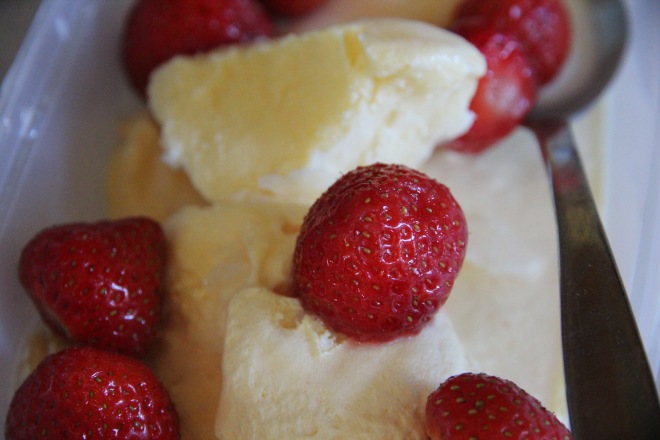
Strawberries are those red gems in the veg patch. They are so good for so many different recipes. You have Strawberry Jam, Strawberry and Rhubarb Jam, Strawberries and Elderflower Cake. Strawberries are amazing with natural Greek yoghurt, chocolate cake (which we have been having a lot of, of course), chocolate mousse, mashed with banana (oh, childhood), banana and strawberry smoothies. But one of my recent-ish discoveries has been how good strawberries go with just plain old vanilla ice cream.
It is no surprise that they go wonderfully well with some food chocolate ice cream (because what doesn’t go well with chocolate ice cream?), but as I am not someone particularly ecstatic about the idea of vanilla ice cream, I was very surprised when I had to eat it for dessert at one time in my life, how well the mixture went together.
The subtle vanilla twang and the creamy consistency of the ice cream got marvellously with this juicy berry, but it also looks so spectacular together: the red and white colours mixing together.
I have been replicating that dreamy match lately with some homemade vanilla ice cream (oh yes, I have recently discovered how yummy and easy it is to make ice cream, even without an ice cream maker).
So, lots of strawberries? No problem! Here is your next recipe…
Rosmarinus officinalis, commonly known as rosemary, is a woody, perennial herb with fragrant, evergreen, needle-like leaves (similar to hemlock needles) and white, pink, purple, or blue flowers. It is a member of the mint family Lamiaceae. The name “rosemary” derives from the Latin for “dew” (ros) and “sea” (marinus), or “dew of the sea” – how beautiful!
From the internet – I have a lack of rosemary photos…
The plant is also sometimes called anthos from the ancient Greek word ἄνθος, meaning “flower”. Rosemary has a fibrous root system. It is native to the Mediterranean and Asia, but is reasonably hardy in cool climates. It can withstand droughts, surviving a severe lack of water for lengthy periods so perfect for the really sandy soil gardens. Forms range from upright to trailing; the upright forms can reach 1.5 m (5 ft) tall, rarely 2 m (6 ft 7 in). The leaves are evergreen, 2–4 cm (0.8–1.6 in) long and 2–5 mm broad, green above, and white below, with dense, short, woolly hair. The plant flowers in spring and summer in temperate climates, but the plants can be in constant bloom in warm climates; flowers are white, pink, purple or deep blue. Rosemary also has a tendency to flower outside its normal flowering season. It has been known to flower as late as early December, and as early as mid-February (in the northern hemisphere).
The Virgin Mary is said to have spread her blue cloak over a white-blossomed rosemary bush when she was resting, and the flowers turned blue. The shrub then became known as the “Rose of Mary”. Rosemary was considered sacred to ancient Egyptians, Romans and Greeks.
In the Middle Ages, rosemary was associated with wedding ceremonies. The bride would wear a rosemary headpiece and the groom and wedding guests would all wear a sprig of rosemary. Rosemary was often entwined into a wreath, dipped in scented water and worn by brides at the alter. The wreath symbolized fidelity, love, abiding friendship and remembrance of the life the woman had led prior to her marriage. The crowns and garlands of rosemary at weddings, in turn, led to the lays, or amorous ballads of the Troubadours, 1100 – 1350, referring to rosemary as “Coronary”. Anne of Cleves (1515 – 1557), Henry the Eighth’s 4th wife, wore a rosemary wreath at their wedding. At that time, wealthy bridal couples would also present a gilded branch of rosemary to each wedding guest. Robert Hacket, in a wedding sermon in 1607 said, “Let this Rosemarinus, this flower of men, ensigne of your wisdom, love and loyaltie, be carried not only in your hands, but in your heads and hearts.” Rosemary root was “seethed in wine vinegar” and the lotion was then used to wash the feet of a thief. The lotion was thought to sap the strength of the robber so that he would not longer commit robbery, steal or do any further harm. The Countess of Hainault, Jeanne of Valois (1294 – 1342), sent her daughter Queen Phillippa (1311 – 1369), wife of King Edward III of England (1312 – 1377), an accounting of the virtues of rosemary and it is presumed a number of plants or cuttings accompanied the gift. The original manuscript can be found in the British Museum. The Countess suggests that laying the leaves under the head of a man while he sleeps will “doth away evell sprirites and suffereth not the dreeme fowl dremes ne to be afearde.”
Bancke, in his work Herball from 1525, suggests techniques to use rosemary as a remedy for both gout of the legs and to keep the teeth from all evils. He also recommended that smelling rosemary regularly would “keep thee youngly”. Serapio suggested that a garland of rosemary worn about the head was a remedy for the “stuffing of the head, that commeth through coldnes of the brain”. He also says that rosemary grew so plentifully in Languedoc (a former province in south-eastern France) that “the inhabitants burne scarce anie other fuel”.
Rosemary was also believed to offer protection from the plague. In 1603, when bubonic plague killed 38,000 Londoners, the demand was so high that the price increased from one shilling for an armful of branches to six shillings for a handful. To put that price increase into perspective, one price list from 1625 indicated that one could obtain 18 gallons of good ale or double beer with carriage delivery for only 3 shillings or an entire ‘fat pig’ for 1 shilling.
Rosemary has long had a popular reputation for improving memory. The Guardian reported in 2017 that sales of Rosemary oil to students in the UK studying for exams had skyrocketed because of Rosemary’s perceived benefits to memory (that was the summer my mum started feeding my sister rosemary for her A-Level exams…). The plant has also been used as a symbol for remembrance during war commemorations and funerals in Europe and Australia. Mourners would throw it into graves as a symbol of remembrance for the dead. In Shakespeare’s Hamlet, Ophelia says, “There’s rosemary, that’s for remembrance” (Hamlet, iv. 5.). In Australia, sprigs of rosemary are worn on ANZAC Day to signify remembrance; the herb grows wild on the Gallipoli Peninsula. Rosemary history includes a number of references to its reputation for strengthening the memory and as a symbol for remembrance. Greek scholars were known to twine rosemary in their hair when studying for exams in the hope of aiding their memories. According to one old ballad:
“Rosemary is for remembrance
Between us day and night,
Wishing that I may always have
You present in my sight.”
Parkinson (1567-1650), the King’s Botanist to Charles I, mentions that in countries where rosemary was well-suited and grows to a large size that thin boards of rosemary were used to make lutes and other instruments, carpenters rules, and a myriad of other implements. The French believed that combing their hair once a day with a rosemary wood comb would prevent giddiness. Rosemary wood was so prized that unscrupulous merchants would often use less expensive woods and simply scent them with rosemary oil. In Spain, rosemary was used as a protection against witchcraft and menaces on the road. George Borrow mentioned how he came to learn about this superstition in his work The Bible in Spain (1843). He first mentions meeting a traveler who had adorned his hat with rosemary and later mentions a lady, who concerned for Borrow’s own safety, offered him some for his own hat.
In 1987, researchers at Rutgers University in New Jersey patented a food preservative derived from rosemary. The chemical called rosmaridiphenol, is a very stable antioxidant useful in cosmetics and plastic food packaging.
Set out rosemary in spring, planting seedlings 2 to 3 feet apart. Plants are slow growing at first, but pick up speed in their second year. Feed with a good fertiliser and keep well watered. Mulch your plants to keep roots moist in summer and insulated in winter, but take care to keep mulch away from the crown of the plant. In the spring, prune dead wood out of the plants.
From the internet
Since it is attractive and drought-tolerant, rosemary is used as an ornamental plant in gardens and for xeriscape landscaping, especially in regions of Mediterranean climate. It is considered easy to grow and pest-resistant. Rosemary can grow quite large and retain attractiveness for many years, can be pruned into formal shapes and low hedges, and has been used for topiary. It is easily grown in pots and the ground cover cultivars spread widely, with a dense texture. Rosemary grows on friable loam soil with good drainage in an open, sunny position. It will not withstand waterlogging and some varieties are susceptible to frost. It grows best in neutral to alkaline conditions (pH 7–7.8) with average fertility. It can be propagated from an existing plant by clipping a shoot (from a soft new growth) 10–15 cm (4–6 in) long, stripping a few leaves from the bottom, and planting it directly into soil.
Rosemary leaves are used as a flavoring in foods such as stuffing and roast lamb, pork, chicken and turkey. Fresh or dried leaves are used in traditional Mediterranean cuisine. They have a bitter, astringent taste and a characteristic aroma which complements many cooked foods. Herbal tea can be made from the leaves. When roasted with meats or vegetables, the leaves leave a mustard-like aroma with an additional fragrance of charred wood, compatible with barbecues.
Mum’s Herby Bread
Serves 10
-1tsp fast-action dried yeast -500g strong white bread flour -1tsp salt -1tbsp sugar -380ml tepid water -20ml olive oil
For the herbs: -1 handful rosemary -1 handful thyme -1 handful sage -2-4 large garlic cloves, diced -olive oil, for brushing
Add 1tsp of yeast to a large bowl. Add the flour, salt and sugar. Mix in a little bit of water at a time, turning over the ingredients with your hands or an electric machine’s dough hook. Once you have a sticky, but not soggy dough consistency, tip into another large bowl coated with the olive oil. Cover with a tea-towel or a plastic bag and place in a warm location (airing cupboard is good), for about an hour or two, or until the loaf has risen.
Meanwhile, preheat the oven to 200C. Roll out the dough onto a surface dusted with semolina or flour and knead into a round shape. Place on a lined baking tray. Brush with olive oil before scattering a handful of rosemary, thyme, sage and diced garlic cloves on top.
Bake in the oven for about 20 minutes. The bread will be golden on top and will sound hollow when tapped on the bottom.
I’m currently making redcurrant jelly and cranberry sauce (at least it has made room in the freezer for the other’s turkey).
We always put out redcurrant jelly and cranberry sauce for christmas lunch as one of the christmas sauces to have along with the main meal.
For the last couple of years, I’ve also been making redcurrant jelly along with raspberry jam for presents, especially to my cousin who has been very receptive and lovely about my homemade concoctions – brave soul!
Do you fancy making your own sides for christmas dinner? They are very easy and the recipes are right here, specially for you!
Redcurrant Jelly
(Makes 4-5x 225g jars)
– 1kg redcurrants – 400ml water – Granulated sugar (see method for further instructions about amounts needed)
Put the redcurrants in a large pan with 400ml of water. Simmer until soft and the juices from the currants have leaked. It should take about 45 minutes.
Strain through a jelly bag/muslin for several hours, better yet to leave it overnight, taking care not to poke or prod as this will result in a cloudy jam.
3. Measure the juice and put it into a clean pan. For every 600ml of juice, add 450g of sugar as you start to bring the pan of liquid to the boil, stirring the sugar in until it has dissolved. Bring it to a rapid boil and leave it for about 8 minutes, stirring occasionally to check if the liquid is becoming sticky rather than runny.
4. Pectin test: Put a china plate inside the freezer until it is cold. Put a small dollop of jelly on the plate and put it back in the freezer for a minute. Remove and run your finger through the middle – if it leaves a trail, it is done. If it starts to run back together, continue to boil and keep checking regularly – be careful not to leave it for too long or it will burn but under-boil it and it will not set.
5. Once your jelly has started to set, remove from the heat and allow to cool before ladling the liquid into sterilised jam jars.
6. To sterilise jam jars, place the jars and lids inside an oven preheated to 150C until warm to the touch. Remove from oven and leave to cool completely before using.
7. Place a wax disc over the top of the jelly in the jars to help them keep longer, seal the lid and label. Store in a cool, dry, dark place overnight before using to allow it to set properly. Serve with your Sunday roast dinner. Use within 12 months.
-900g fresh/frozen cranberries -Juice of 2 oranges -150g granulated sugar
Place the cranberries in a large pan.
Add the juice of the oranges to the pan followed by the sugar.
Bring everything up to simmering point, stir well, put a lid on the pan and let it all simmer for about 20 minutes, or until the cranberries are breaking down. Stir now and then.
Remove the pan from the heat. When it is cool enough to handle, scrape into sterilised jam jars. Store in the fridge. For freezing, when cool transfer the relish to a plastic container and freeze.
Here is the link for more cranberry recipes and fun facts about the fruit:
Sweetcorn (Zea mays convar. saccharata var. rugosa), is a variety of maize with a high sugar content. It is the result of a naturally occurring recessive mutation in the genes which control conversion of sugar to starch inside the endosperm of the corn kernel. Unlike field corn varieties, which are harvested when the kernels are dry and mature (dent stage), sweetcorn is picked when immature (milk stage) and prepared and eaten as a vegetable, rather than a grain.
Ready for pollinating
The cultivation of corn as maize began over 8000 years ago in Mesoamerica, a geographical area which includes central and southern Mexico, and Central America. Corn was first domesticated from teosinte (Zea mexicana), an annual grass native to this region. Wild teosinte mostly has value as a fodder plant, as it provides very little edible seeds. The first archaeological evidence of domesticated corn comes from the San Marcos cave in Tehuacan and the Guilá Naquitz cave in the state of Oaxaca, Mexico. The corn in San Marcos cave is dated to over 5,000 years ago. The cobs from the Guilá Naquitz cave were dated to over 6200 years old. Humans first domesticated corn by selecting the teosinte plants that had the largest amount of edible seeds until they eventually provided a substantial food source. In the process, humans have transformed corn into a plant that can no longer self-sow and modern corn now requires breaking the tightly bound cob to remove the seeds. Wild teosinte, however, is very fragile and the seeds easily fall off and grow new plants. Without human interaction modern corn would probably cease to exist.
Tassels – this is where the grainy seeds need to fall to pollinate
The Iroquois, Native American tribes, gave the first recorded sweetcorn, called ‘Papoon’, to European settlers in 1779. It soon became a popular food in southern and central regions of the US. Open pollinated cultivators of white sweetcorn started to become widely available in the US in the 19th century. Two of the most enduring cultivars, still available today, are ‘Country Gentleman’and ‘Stowell’s Evergreen’. Sweetcorn production in the 20th century was influenced by the following key developments: hybridisation allowed for more uniform maturity, improved quality and disease resistance, and, in 1933 ‘Golden Cross Bantam’ was released. It is significant for being the first successful single-cross hybrid and the first specifically developed for disease resistance. Open pollinated (non-hybrid) corn has largely been replaced in the commercial market by sweeter, earlier hybrids, which also have the advantage of maintaining their sweet flavour longer.
Grainy seed tops
There are different varieties of sweetcorn – old types and supersweet types as well as mini types. Choose only one variety or they cross pollinate and make a gross hybrid that you don’t want.
I’ve only grown ‘Swift F1’ – and it is brilliant.
5’3+ tall sweetcorn, 2018
Sow in pots as early as March or as late as May, indoors. I use tall yoghurt pots filled with compost. Keep them in warm temperatures to grow with plenty of water and sunlight. Plant them out when they are about 7cm tall and the frosts have most definitely passed, May or June, 30cm apart. Sweetcorn is wind pollinated so plant them in clustered groups (picture the fields of corn grown on the country farms around Britain, all packed together) rather than rows to maximise pollination. Plant in soil that has been prepared with compost and well-rotted manure. I keep feeding mine with Blood, Fish and Bone and well-rotted manure or a liquid feed throughout the season to encourage the growth of the corn itself. Keep well watered in any dry periods. To increase pollination, try brushing the dusty pollen off the tops of the sweetcorn onto the tassels – this is where the corn will grow if pollinated. The tassels on the plant will turn yellow if fertilised. The cobs are ready when the tassels turn dark brown, July-September. To check, peel back the green covering and pierce a thumbnail into one of the niblets – if the liquid that is released is milky, your sweetcorn is ready. If it is clear, leave if a little longer but check daily.
Undeveloped corn on the cobs
The aim is to harvest sweetcorn in its prime. The sugars convert to starches rapidly once the corn leaves the plant and the taste will only become poorer as time goes on – same for asparagus and peas. Have the pan of boiling water ready, pick and plunge your cobs straight in. Or freeze them immediately (it stops the sugar/starch conversion process).
Tassels dying back – the corn is forming
The only problems with sweetcorn are they take up space, they might not pollinate as reliably as insect pollinated plants (it will be very weather dependent) and if you have a problem with mice you might need to consider some protection.
For companion planting, consider the ‘Three Sisters’ from the USA: sweetcorn, beans and pumpkins. My first year I grew pumpkins with the sweetcorn. Last year I grew lettuces and radishes between them. This year I am considering a variety of cucurbits because they both enjoy the sunny conditions – courgettes, pumpkins and squashes, that is.
To cook and eat sweetcorn: it can of course become ‘corn on the cob’ – boil, grill or barbecue and slather in butter and hand them out for people to chew off the little gold nuggets. To remove the kernels from the cob, boil for a few minutes in boiling water (don’t add salt, it hardens the kernels), get a sharp knife and scrape them off into a bowl and serve.
They are lovely with any meal that includes boiled veg, salads, mixed with tuna and mayonnaise is a traditional one, delicious with peas and baked potatoes mashed with butter, they are a traditional vegetarian option for the barbecue – try spreading some chill sauce over the top after grilling for a spicy taste. I think they are delicious also in a stir fry and a great addition to Egg Drop Soup with Vegetable Stock. I offer you the other recipe that springs to mind when I picture sweetcorn – my mum’s sweetcorn fritters.
Sweetcorn Fritters
(Makes enough to serve 4 people a few each)
-260g fresh sweetcorn (if you are using bought canned, use a 325g tin) -100g gram flour (or plain flour, gram flour is made from chickpeas and adds extra protein) -3 eggs -120g cheddar cheese -80g Gruye cheese -50g grated courgette or 1tbsp milk, optional -Small knob of butter, for frying
Scald the fresh sweetcorn so the corn comes off the cob easier. If you are using tinned sweetcorn, drain it and set to one side.
In a large bowl, sieve in the flour. Make a well in the middle. Add the eggs and stir them into the flour to make a batter.
Grate the cheese and mix it in. Ass the corn and either a little courgette or milk to make it a dropping consistency, only a little though.
Warm up the butter in a frying pan and drop spoonfuls of the batter into it – four per frying pan. Fry on one side and then flip over, using a spatula, and fry on the other side. Press down on the batter – when it is no longer leaking liquid, it is cooked through. Place on a plate lined with kitchen roll. Serve with vegetables, salad, rice, potatoes, dips… ketchup?
My mum is very into her stewed plums at the moment since I made plum crumble this year. Fortunate as we have so many Victorias (no greengages 😦 ) that I don’t know what to do with them all. I have no space in the freezer to keep them for jam and no time to make jam!!!
She begged me one evening for more stewed plums on their own without the crumble. It was really quick, easy and got rid of a container full of them. Great!
She loved eating them just plain but she also had some with yoghurt. Custard would be delicious with it. It only takes about ten minutes and makes a really quick and simple dessert or snack.
Stewed Plums
-400g plums -1-2 handfuls of granulated sugar
Remove the stones from the plums by cutting them in halves. Place in a non-stick pan over a high flame.
Add the sugar and stir into the plums. Allow the plums to heat up and start bubbling before turning down the flame down to a low heat. Continue to stir to encourage the plums to break up.
Leave simmering for at least 10-15 minutes. Remove from the heat and serve plain or with yoghurt, ice cream, cream, custard or with pieces of shortbread or plain sponge cake. Store left overs in an airtight container in the fridge or freeze.