It is a little early to be talking about cherries in the UK… a few months early… but it is exciting to see cherries ready on the trees. We might even get some this year instead of the birds. They have already done an excellent job of eating the cherry and plum tree leaves – I had no idea they were that tasty…
We were given a bag of cherries from a friend who takes the left overs from a market for her chickens and gives us a huge portion of it to feed little piggy and chooks. Some were on the turn, queue cherry baking time.
I’ve got a favourite cherry cake recipe (find it here Cherries) but I was lacking in some ingredients and, to be honest, I wanted chocolate cake 😛
So I trawled the internet to find a chocolate one that had the ingredients we had in the house. I had just enough to make one from https://www.kitchensanctuary.com
It is most definitely not my own creation even though I would love to take credit for it, but it is so delicious that I think the word should be spread. It is a new favourite chocolate cake.
Flourless with ground almonds, fresh cherries, chocolate chunks in a chocolate cake, lovely gooey texture – what is not to like?!
Chocolate Chunk Cherry Cake
(Serves 10)
-225g butter, softened -200g granulated sugar -1tsp vanilla extract -4 eggs -200g ground almonds -50g cocoa powder -1tsp baking powder -100g dark chocolate -100g dark or milk chocolate cut into chunks -200g fresh cherries
Preheat oven to 170C. Line a 20cm/9inch deep cake tin with baking parchment.
In a large bowl, beat together the softened butter and the sugar until light and fluffy.
Mix in the vanilla extract and the eggs one at a time until well incorporated into the mixture.
Stir in the ground almonds, cocoa powder and baking powder, mixing well to combine.
Melt 100g of dark chocolate in a heatproof bowl over the hob or in a microwave. Mix into the cake mixture followed by the chunks of unmelted chocolate.
Scrape the contents of the bowl into the prepared baking tin.
Remove the stems from the cherries and cut them open, removing the stones from the centre. Scatter the cherries over the top of the cake’s surface.
Bake in the centre of the oven for about 50 minutes or until a skewer inserted into the centre comes out clean. Leave to cool in the tin before transferring to the wire rack to cool completely. It is also delicious served warm.
When completely cold, store in an airtight container for up to three days.
Here is a little winter/autumn warming treat to see you through January and February, and a great way of using apples left over in storage from the harvest of 2018.
Mum’s Baked Apples
Serves 6
-6 large baking apples -3/4 cup dark brown sugar -1/2 cup raisins -1/2tsp ground cinnamon -1/4tsp grated nutmeg -1tbsp butter
Preheat the oven to 180C.
Wash and core apples, then remove a 1-inch strip of peel around the middle of each. Arrange the apples in a baking dish, 2-quart shallow.
Combine the brown sugar, raisins, cinnamon, and nutmeg in a small bowl. Carefully fill the center of each apple and dot with 1/2tsp of butter.
Add just enough water to the baking dish to cover the bottom. Bake, uncovered, for 45-60 minutes, or until the apples are tender (larger ones will take longer). Baste the apples with the juices occasionally.
Serve the apples warm. Left-overs can be stored in an airtight container in the fridge.
But it is getting tricky to get the courage up enough to venture out into the heat trap in the veg garden to pick the fruit.
Someone told me this has been a really good year for strawberries, all due to the time the rain fell this winter (which I thought was all the time. Incessantly. Non-stop). It has certainly been a good strawberry year for us. I’ve been eating them all the time for last couple of weeks.
On top of the strawberries, the raspberries have taken off, along with the red currants, boysenberries, jostaberries and the blackcurrants. I think I almost had a breakdown end of last week due to the overwhelming amount that needed to be picked.
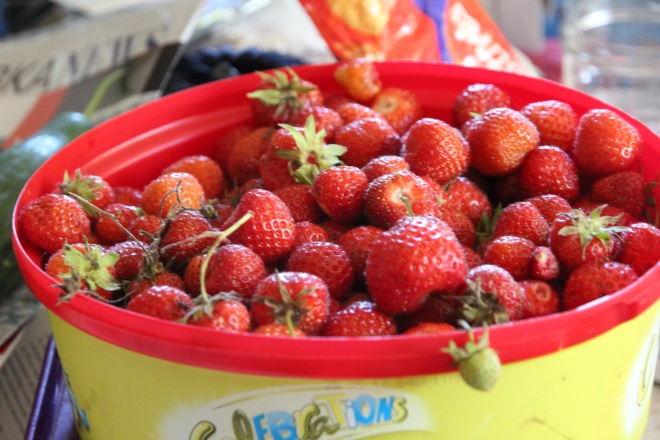
This blurry photograph is of 45 minutes picking of just strawberries. I didn’t even get half way through the patch, and I have eaten a few handfuls from the container already…
Strawberries are those red gems in the veg patch. They are so good for so many different recipes. You have Strawberry Jam, Strawberry and Rhubarb Jam, Strawberries and Elderflower Cake. Strawberries are amazing with natural Greek yoghurt, chocolate cake (which we have been having a lot of, of course), chocolate mousse, mashed with banana (oh, childhood), banana and strawberry smoothies. But one of my recent-ish discoveries has been how good strawberries go with just plain old vanilla ice cream.
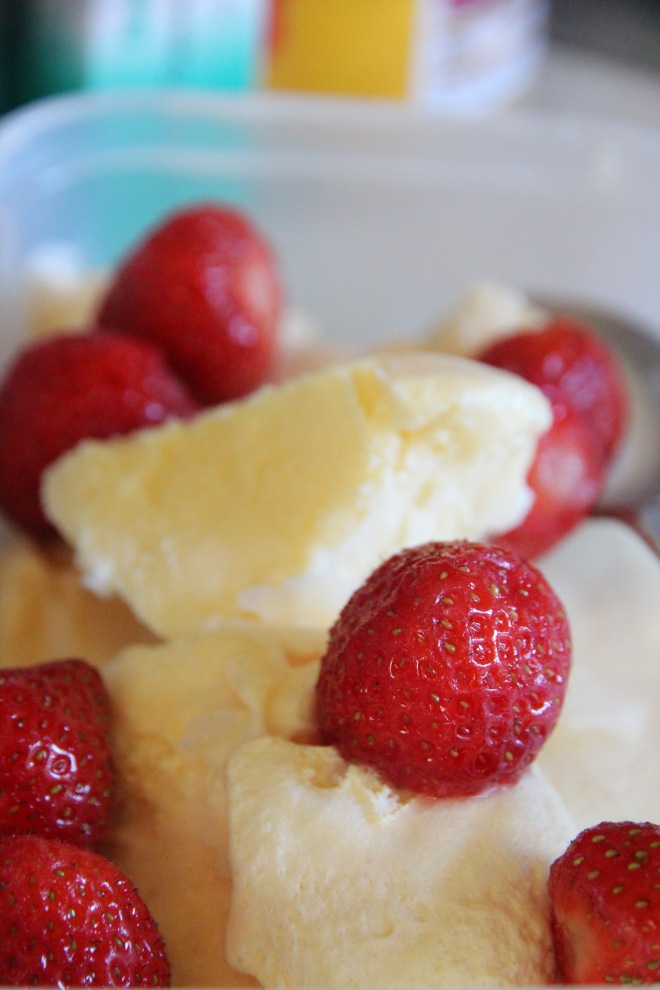
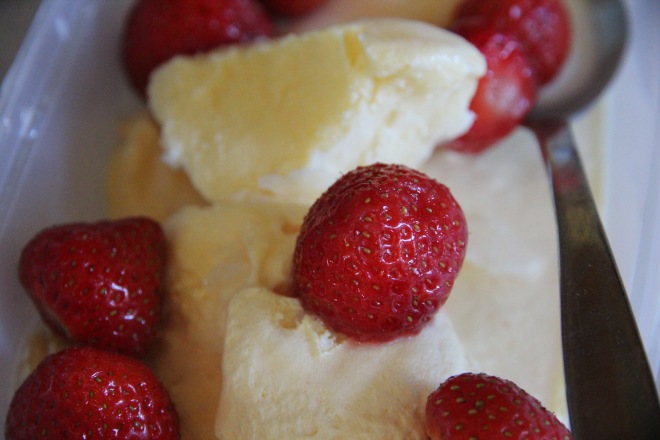
It is no surprise that they go wonderfully well with some food chocolate ice cream (because what doesn’t go well with chocolate ice cream?), but as I am not someone particularly ecstatic about the idea of vanilla ice cream, I was very surprised when I had to eat it for dessert at one time in my life, how well the mixture went together.
The subtle vanilla twang and the creamy consistency of the ice cream got marvellously with this juicy berry, but it also looks so spectacular together: the red and white colours mixing together.
I have been replicating that dreamy match lately with some homemade vanilla ice cream (oh yes, I have recently discovered how yummy and easy it is to make ice cream, even without an ice cream maker).
So, lots of strawberries? No problem! Here is your next recipe…
My mum is very into her stewed plums at the moment since I made plum crumble this year. Fortunate as we have so many Victorias (no greengages 😦 ) that I don’t know what to do with them all. I have no space in the freezer to keep them for jam and no time to make jam!!!
She begged me one evening for more stewed plums on their own without the crumble. It was really quick, easy and got rid of a container full of them. Great!
She loved eating them just plain but she also had some with yoghurt. Custard would be delicious with it. It only takes about ten minutes and makes a really quick and simple dessert or snack.
Stewed Plums
-400g plums -1-2 handfuls of granulated sugar
Remove the stones from the plums by cutting them in halves. Place in a non-stick pan over a high flame.
Add the sugar and stir into the plums. Allow the plums to heat up and start bubbling before turning down the flame down to a low heat. Continue to stir to encourage the plums to break up.
Leave simmering for at least 10-15 minutes. Remove from the heat and serve plain or with yoghurt, ice cream, cream, custard or with pieces of shortbread or plain sponge cake. Store left overs in an airtight container in the fridge or freeze.
So… making raspberry curd and it using to make a pink cake just wasn’t fun enough. I had to try blackberries too!
We’ve had such a good harvest of blackberries this year thanks to the delightful rain we have in Surrey currently. Really, it can stop now, we’d like summer back please.
I made good use of the harvest by trying to make another berry curd.
Stirring the blackberries into the curd
After making the curd I tried to create another fruit curd cake. I was afraid that it was going to be quite bitty because blackberries have so many seeds, but honestly I didn’t even really notice it. It tasted very fruity, was a pink/purple colour with dark purple speckles from the bits of berries. The cake had a crusty top but a soft, light sponge. It was very quick and easy once the curd was made.
If you don’t fancy the cake or have far too much curd left over, try using it as a topping to ice cream – my brother recommends it!
Blackberry Curd
– 4 egg yolks – 250g sugar – 200g butter – Zest and juice of 2 small lemons – 200-300g blackberries
In a pan, whisk together the yolks and sugar until combined.
Mix in the butter and lemons. Over a low flame, whisk the mixture, as if you are making custard, until it has thickened. This should take 20-30 minutes.
Remove from the heat and stir in the raspberries so that they breakdown and the mixture becomes pink coloured.
Leave it to cool completely before using it in a cake, spreading it on bread, or storing it in preserved jars in the fridge for up to a month.
Preheat the oven to 180C. Line a 1kg loaf tin with baking paper.
Beat the butter and the sugar together in a bowl until creamy.
Mix in the eggs, followed by the flour and baking powder.
Finally, mix in the curd until thoroughly combined.
Scrape the contents of the bowl into the prepared tin. Bake in the oven for 1 hour. Test to see in the cake is cooked by inserting a skewer into the centre. If it comes out clean, it is done.
Leave the cake to cool in the tin before transferring it to a wire rack.
Serve the cake in slices with more of the curd spread on top. Store in an airtight container for three days.
It is Mother’s Day tomorrow and even though I am not at home right now and unable to make one of the greatest people in my life a special cake, give her a hug and a bouquet of primroses from the garden and I can’t spend the day with her, I offer you the link to my baking blog to inspire everyone to roll up their sleeves and get baking for the perfect, homemade gift for their mum. Top the baked item with edible primroses from the garden, the perfect spring celebration!
I always see blackberries as an autumnal fruit to forage and pick from the many brambles in the garden so it always surprises me when they are ready in July or August. We have been picking blackberries to eat raw for some time but I did get round to making an early apple and blackberry crumble from some early windfalls from our neighbours – if you cook them well enough, they taste fine.
Get picking!
Apple and Blackberry Crumble
(Serves 6)
– About 1kg cooking apples – About 200g-300g blackberries – Caster/ granulated sugar, to sprinkle over the fruit
For the crumble topping: – 170g plain flour – 110g salted butter – 55g caster/ granulated sugar
Preheat the oven 150C.
Peel and core the apples before cutting them into slices. Place them in an oven-proof dish. Add the blackberries and mix in so that the layers are combined.
Sprinkle a generous amount of caster or granulated sugar over the top and mix into the layers. You want to have a nice thick layer of fruit as it is going to decrease in size during the cooking process.
Make the crumble topping: put the flour into a bowl followed by the sugar and salted butter. Rub together using your fingertips until the mixture resembles large bread crumbs (add more butter if too dry and more flour if too sticky). Sprinkle the crumble topping over the top of the sugar coated fruit inside the dish.
Bake in the oven for about an hour or until hot and golden brown on top and the fruit is cooked. Once done, you can turn off the oven and leave the crumble inside to stay warm until you are ready to eat it. Serve hot with custard.
This pudding will be associated with school for most people but a homemade version will rid any melancholy feelings towards the humble Roly-Poly. It was once called ‘Dead Man’s Arm’ because of the look… It makes a fun Halloween story.
Suet can be bought in most shops, including vegetarian suet made from vegetables rather than beef, the one I use. If you can’t get hold of any suet, try freezing a packet of butter and grating off the same amount required in the recipe to replace it. Raspberry is the popular jam most people choose to use but you can of course use any type of jam you like for the filling. My mum once made what we called ‘Fruit Loop Jam’: raspberries, cooking apples, blackberries, rosehips, jostaberries, blackcurrants, rowans, elderberries and goodness knows what else! She cooked it all up and strained it through muslin, like a jelly, before boiling it up and creating a jammy rather than jelly-like consistency. It was a little like a cross between a raspberry jam and bramble jelly, dark in colour and strong in taste. It was a little too overpowering on toast but was absolutely delicious cooked inside this suet pudding. I think you need a strong tasting jam for Roly Poly, I would choose something like blackcurrant or gooseberry over mild tasting jams like strawberry.
So if you make any jams you find too strong for your taste-buds, try using the batch in cooked in a pudding instead and you might create something as wonderful as a Jam Roly-Poly.
Jam Roly-Poly
(Serves 6)
– 50g butter – 250g self-raising flour – 50g shredded suet (vegetable or beef) – 150ml milk – At least 200g jam of choice
Put a deep roasting tin onto the bottom shelf of the oven, 2/3 full of boiling water. Preheat the oven to 180C.
Tip the butter and flour into a food processor or a large bowl and using an electric whisk, mix until combined. Mix in the suet before pouring in the milk and mixing until the ingredients form a sticky dough (you may need a little more milk if the consistency doesn’t seem right).
Tip the dough onto a lightly floured surface. Pat the dough until smooth before rolling it out as flat as you can, until it is a sort of large square shape at 25x25cm big. Leaving a gap along one edge, spread jam thickly all over the surface of the dough. Pick up the opposite edge to the jam-free side and roll the dough up. Pinch the jam-free edge into the dough where it meets and pinch the ends of the roly-poly roughly too, patting top of the wrap gently to smooth it out.
Cut a large piece of foil and gently place the roly-poly in the middle of it. Bring the foil around the pudding and scrunch together along the edges and ends to seal it – do not wrap too tightly as the pudding will puff up while it is cooking.
Lift the foil gently and place it on the rack above the roasting tray in the middle of the oven and leave it to cook for 1 hour. Allow the pudding to sit for five minutes on a wire rack once it has been removed from the oven. Unwrap and thickly slice to serve. It can be left for a long time wrapped in the foil to keep it warm until you are ready for it and it freezes well too. It is traditional to serve it with custard but I prefer mine plain. Others like it with vanilla ice cream or Greek yoghurt and served with clotted cream makes it taste like a warm cream tea!
The blackcurrant (Ribes nigrum) is a woody shrub in the family Grossulariaceae. Bunches of small, glossy, black coloured currants grow along the stems in the summer and can be harvested by hand or by machine when grown commercially.
Blackcurrants became a domesticated crop fairly recently in fruit history, about 500 years ago. The blackcurrant, a native to Europe and Asia, was cultivated in Russia by the 11th century when it was grown in monastery gardens, towns and settlements. The earliest records in the UK date back to the 17th century when the leaves, bark and roots of the plant were used as herbal remedies in the medicinal world. By 1826, 5 cultivars were listed by the Royal Horticultural Society. Most of the subsequent cultivar development during the 19th century was based on the introduction of plants raised by private individuals or nurserymen from the open-pollinated seed of cultivars that already existed. By 1920, 26 cultivars were classified into four main groups of similar or synonymous cultivars in England (look at the ‘Blackcurrant Foundation’).
During World War II in the 20th century, most of the UK’s overseas supply of citrus fruit, such as oranges, were blocked by U-boats and the population was in danger of being starved of vitamin C. Afraid of a poorly country, the government started to encourage the people to grow blackcurrants themselves as they are impressively high in this nutrient. From 1942, blackcurrant syrup was distributed free of charge to children under the age of 2 and at the same time most of the country’s crop were made into the cordial we all know today from our childhood. Today, the commercial crop is completely mechanised and about 1,400 hectares of the fruit are grown, mostly under contract to the juicing industry. In Britain, 95% of the blackcurrants grown end up in that fruit juice, ‘Ribena’ (the brand’s name is derived from Ribes nigrum) and similar fruit syrups and juices.
In Russia, blackcurrant leaves may be used for flavouring tea or preserves, like salted cucumbers and the berries for homemade wine. Sweetened vodka may also be infused with the leaves colouring the beverage a deep greenish-yellow and giving it a tart flavour and astringent taste. Blackcurrants were once popular in the USA as well but became less common during the 20th century after current farming was banned when blackcurrants, as a vector of white pine blister rust were considered a threat to the USA’s logging industry. Since the ban drastically reduced the currant production nationally for nearly a century, the fruit remains largely unknown in the US and has yet to regain its previous popularity to levels enjoyed in Europe but time will tell – it is difficult not to like these punch tasting little dark jewels. Owing to its flavour and richness in essential nutrients, awareness and popularity of the blackcurrant is growing with a number of consumer products already entering the US market.
Blackcurrant ripening earlier this year
Blackcurrants and their crosses (we grow Jostaberries – a cross between a gooseberry and a blackcurrant that we stew and use in jams and jellies) are self-fertile, making them a pleasingly simple fruit to look after. It is happiest in a sunny, fertile place but will also do well in a damper spot where most other fruit would struggle to thrive. Most varieties get quite large, they average about 1.5m in height and spread so plant your bushes far apart so that they get adequate space, nutrition and so that you can pick the delicious harvest easily. Blackcurrants will be fine to be neglected now and then but they are generally hungry and thirsty plants so keep them well fed and watered to get the best results. Treat blackcurrant bushes as you would treat raspberries or fruit trees – feed them every spring, probably around March, with some very well-rotted manure and Blood, Fish and Bone and a layer of mulch to hold all of those nutrients there for the fruit bush/tree, especially if it is a wet spring otherwise it will all be washed away. If your blackcurrants are going in all directions and falling onto paths and other crops as their branches get heavier with the currants, prop them up against a poll or strong cane and tie them gently with string in a fashion so that you still pick the fruit. If you lose most of your harvest to birds, try investing in some netting to cover the bush with. We fortunately have so many blackcurrant bushes from them spreading themselves during the garden’s years of neglect that blackcurrants are one of the few fruits we never need to net (that and raspberries) but birds do love them, we are just lucky to have enough to share with them! Our blackcurrant collection has drastically increased over the years due to the marvellous ability our bushes have of producing ‘babies’. If a branch buries itself into the soil, it will produce a whole new bush. If you have enough of these plants, tie up any branches embedding themselves into the soil and producing roots or lie them on a hard surface, like a large rock or tile to prevent them from producing more bushes.
You should be able to harvest your blackcurrants from July-August. It is quite a short season, merely a couple of weeks. The blackcurrants are ripe for picking when they are large, darkly coloured and ever so slightly squishy in your fingers and will come of the branch with less fuss than an under-ripe one (that will be small, coloured red or green still). You should be able to prune from August through to January. You can combine harvesting with pruning – if you have time. As the currants ripen, snip off the short trusses of fruit with secateurs or chop out the oldest third of the plant down to the crown with the trusses still attached to the branch. It will encourage good growth on the plant and help you harvest a good portion of fruit at the same time. In the River Cottage Handbook, ‘Fruit’, Mark Diacono recommends placing the cut branch in water to extend the life of the fruit to give you a little longer to use it. He also recommends using a fork to strip the fruit from the trusses.
As a crop, the blackcurrant suffers from several pests and diseases. The most serious disease is reversion, caused by a virus transmitted by the blackcurrant gall mite. Another is white pine blister rust which alternates between two unrelated hosts, one in the genus Ribus (blackcurrant included) and the other a white pine. As I mentioned before, this fungus caused damage to forests when the fruit was first introduced into North America where the native white pines had no genetic resistance to the disease. Gall midge maggots and blister aphids love blackcurrant leaves. Pick off any leaves that discolour or distort. Bud mites inhabit the buds, making them rounded instead of long. Cut off any affected stems when you notice this happening in spring.
The raw fruit has a high vitamin C content (218% of the Daily Value) and moderate levels of iron and manganese (12% Daily Value, each). Other nutrients are present in negligible amounts (less than 10%).
Phytochemicals in the fruit and seeds, such as polyphenols have been demonstrated, with ongoing laboratory studies, that the fruit has potential to inhibit inflammation mechanisms of heart disease, cancer, microbial infections or neurological disorders like Alzheimer’s. Blackcurrant seed oil is rich in nutrients, particularly vitamin E and unsaturated fatty acids, including alpha-linolenic acid and gamma-linolenic acid.
In Europe the leaves have traditionally been used for arthritis, spasmodic cough, diarrhoea, as a diuretic and for treating a sore throat. As a drink, blackcurrants are thought to be beneficial for the treatment of colds and flu, other fevers, for diaphoreses and as a diuretic. In traditional Austrian medicine, blackcurrants have been consumed whole or as a syrup for treatment of infections and disorders of the gastrointestinal tract, the locomotor system, the respiratory tract and the cardiovascular system. Blackcurrant seed oil is an ingredient used widely in cosmetic preparations, often in combination with vitamin E. The leaves can be extracted to yield a yellow coloured dye and the fruit is a source for a blue or violet dye too. This fruit has a lot of potential for us all.
Blackcurrants can be eaten raw but I prefer them cooked as they are intensely tart in taste. In my opinion, the best way to use blackcurrants has to be blackcurrant jam. The fruit has a high content of pectin (all currants do) and a strong, flowery taste which makes them delicious on their own or as an addition to other fruit jams, like Jumbleberry Jam. My next favourite use of blackcurrants is to stew them with a little sugar to taste in a saucepan over a high flame before leaving them to simmer for a little bit. I then pour it either hot or cold over Greek yoghurt or another plain variety for a delicious pudding or snack (scatter more of your berries like raspberries, strawberries or tayberries over the top if you have an abundant supply to get through, they go very well with the mixture). My cousin loves her blackcurrants raw in her muesli for breakfast. She looked after our chaos while I was on holiday and she was successful in harvesting lots of blackcurrants to take home to have in her cereal and to use for jam. She is very happy that Dorset Cereals have made a variation of muesli that includes blackcurrant already as she can never find the fruit in the supermarkets at home.
I came across an interesting idea of making a blackcurrant trifle-styled pudding (minus the alcohol and custard, but feel free to add them in yourself and to experiment with the recipe). The ingredients go surprisingly well together – ginger, cream and blackcurrants. When making the pudding, I served the fruit separately because my brother doesn’t like blackcurrants (I gave him raspberries and strawberries instead) but I would otherwise recommend pouring the blackcurrants over the top of the ‘trifle-mess’ when assembling it at the end to make it look pretty and scatter some raw ones on top too if you like them that way. Serve small slices, it is overpoweringly strong. When stewing blackcurrants, add the sugar little at a time to taste – people have varying opinions. My mum loves hers to have very little sugar and to be tart, I prefer mine slightly middling, my dad likes his a little sweeter.
Completed Blackcurrant ‘Trifle-Mess’
Blackcurrant ‘Trifle-Mess’
(Serves 10)
For the cake: -100g golden syrup – 100g salted butter – 100g dark brown sugar – 2 tsp ground ginger – 2 large eggs, beaten – 280g plain flour
Additions: – 600ml double cream – 4 tbsp elderflower cordial – 500g blackcurrants – Granulated sugar, enough to taste, start with about 100g – 200g raw blackcurrants or other berries to garnish, optional
To make the cake: preheat the oven 170C and line a 1kg loaf tin with baking parchment. Put the golden syrup, butter and sugar in a non-stick saucepan over a high flame and melt, bringing it to the boil before allowing to cool for 5 minutes.
Stir in the ground ginger and the beaten eggs until combined. Fold in the flour.
Scrape the contents of the saucepan into the lined loaf tin and bake in the oven for 35 minutes. The cake will be done when a skewer inserted into the centre leaves clean and the top is firm to the touch and golden brown. Remove from the oven and leave it to cool in the cake tin before turning it out onto a wire rack to cool completely.
Once the cake is cold, whip the double cream in a large bowl until it forms soft peaks.
Stew the blackcurrants but putting all of the fruit into a pan and turning it onto high heat, stirring it with a wooden spoon. Once the fruit starts to ooze liquid, add a little sugar at a time, stirring it in, until you have enough to taste. Leave to simmer for a few minutes until the currants have released enough liquid and are soft and squidgy.
In a large bowl, break up the ginger cake into cube shapes and scatter over the bottom. Cover with the elderflower cordial. Scrape the whipped cream over the cake-layer. Pour the blackcurrants over the top and scatter more raw blackcurrants or other berries to garnish. To serve, use a large spoon to scoop out all of the layers. Store in a fridge with clingfilm over the top.
Cream on top of the ginger cakeGinger cake for the base