Blueberry Lemon Cake

Come on summer…

IMG_8968.jpg

IMG_8969.jpg

Blueberry Lemon Cake

-225g granulated sugar -2tbsp lemon juice -180g plain flour -2tsp baking powder -Pinch of salt – 1/2 cup of milk -1/2tsp vanilla essence -3 large eggs -1tbsp lemon juice -1/2 cup vegetable oil -300g blueberries -1/4tsp plain flour

  1. Preheat the oven to 180C. Line a 20cm/9inch deep circular baking tin with baking parchment.
  2. Mix the sugar and the lemon juice together. Mix in the flour, baking powder and salt.
  3. Mix in the milk along with the vanilla essence. Then mix in the eggs, followed by the lemon juice and the vegetable oil.
  4. When it has mixed well, add the blueberries with the 1/4tsp of plain flour and gently mix in.
  5. Scrape into the baking tin and bake in the centre of the oven for approximately 1hr or until a skewer inserted into the centre comes out clean.
  6. Leave on a wire rack to cool in the tin before turning out the cake onto the wire rack to cool completely. Store in an airtight container in the refrigerator.

IMG_8972.jpg

IMG_8970.jpg

Raspberry Curd Cake

https://wordpress.com/posts/bellasbakingsite.wordpress.com


Raspberry Curd Cake

IMG_6326.JPG

All of our raspberries are harvested and frozen for this summer’s season. I am using them to make lots of jam, but not only am I trying to make room in the freezer again for the runner beans (oh dear) but I am trying to use up the eggs of our many chickens and ducks that are laying non-stop.

My mum showed me this great idea – raspberry curd.

I thought of an equally good idea – raspberry curd cake.

I’ve already been making my lemon curd cake for a few years now, so why not try raspberry curd instead? Uses up raspberry and eggs, perfect!

Well, the curd was a little runny and when I created my cake mix, it looked bubblegum pink. This kind of frightened me a bit. It looked alright once cooked. When I cut a slice, it was very pink. I carefully tried a bit, with extra curd as a sauce, and wow, I actually thought it was alright! To me, it was better than the lemon curd cake, despite being pink!

If anyones curious to try it, the recipe is below. Have fun!

IMG_6324.jpg


Raspberry Curd

– 4 egg yolks – 250g sugar – 200g butter – Zest and juice of 2 small lemons – 210g raspberries

  1. In a pan, whisk together the yolks and sugar until combined.
  2. Mix in the butter and lemons. Over a low flame, whisk the mixture, as if you are making custard, until it has thickened. This may take some time.
  3. Remove from the heat and stir in the raspberries so that they breakdown and the mixture becomes pink coloured.
  4. Leave it to cool completely before using it in the cake (below), spreading it on bread, or storing it in preserved jars in the fridge for up to a month.

Raspberry Curd Cake

– 75g butter – 150g sugar – 2 eggs – 150g self-raising flour – 1 tsp baking powder – 4 tbsp raspberry curd

  1. Preheat the oven to 180C. Line a 1kg loaf tin with baking paper.
  2. Beat the butter and the sugar together in a bowl until creamy.
  3. Mix in the eggs, followed by the flour and baking powder.
  4. Finally, mix in the curd until thoroughly combined.
  5. Scrape the contents of the bowl into the prepared tin. Bake in the oven for 1 hour. Test to see in the cake is cooked by inserting a skewer into the centre. If it comes out clean, it is done.
  6. Leave the cake to cool in the tin before transferring it to a wire rack.
  7. Serve the cake in slices with more of the curd spread on top. Store in an airtight container for three days.


IMG_6348.JPG


IMG_6352.JPG

Mother’s Day

It is Mother’s Day tomorrow and even though I am not at home right now and unable to make one of the greatest people in my life a special cake, give her a hug and a bouquet of primroses from the garden and I can’t spend the day with her, I offer you the link to my baking blog to inspire everyone to roll up their sleeves and get baking for the perfect, homemade gift for their mum. Top the baked item with edible primroses from the garden, the perfect spring celebration!

Mother’s Day – Make something special for a special person

Flowers for the buzzy bees – link to edible flowers post for future cake decorating ideas

What to do with left over pumpkin?

IMG_4003.JPG

For anyone who is debating throwing out their pumpkin after Halloween – stop!

IMG_3950.JPG

Start by cutting it up into chunks.

Any seeds you have saved from the inside, pat them dry and follow this recipe:

Pumpkin Seed Crisps – smell and taste like popcorn

– Seeds from a pumpkin – Salt and pepper – Olive oil

  1. Preheat the oven to 180C.
  2. Scrape out the seeds from the inside of a pumpkin and pat dry with kitchen roll. Place them on a pan and sprinkle salt and pepper generously over the top along with a little olive oil.
  3. Bake in the oven for 15 minutes or until golden brown.

IMG_4007.JPG

For the pumpkin flesh, put the chunks on large roasting trays and drizzle with olive oil. Pop them in the oven at 180C and roast for about 40 minutes or until they are cooked.

Eat them like this alongside other veggies or dishes or use these roasted slices for another recipe…

IMG_3985.JPG

Pumpkin Curry

(Serves 4)

– 1 onion, finely sliced – 1 tsp ghee or oil for frying – 1 tbsp mustard seeds – 1tbsp nigella seeds – 1 tbsp fenegreek seeds – 1 handful curry leaves – 1 tsp cumin – 1 tsp ground coriander – 1 1/2 tsp ground turmeric – 1 1/4  tsp ground garam masala – 500g roasted pumpkin – 1 large garlic clove, diced  Rice, chapatti, popadom, naan or a mixture, to serve – Freshly cut coriander and parsley, to serve

  1. Oil a large frying pan. Peel and slice the onion into thin strips and place in the pan. Heat high for a few minutes before turning down to simmer, stirring the onion. Let the onion simmer to a golden brown before adding the mustard seeds, nigella seeds, fenegreek seeds and curry leaves, stirring in the ingredients to combine. Allow the contents of the pan to simmer for a few minutes to absorb the flavours.
  2. Add the other spices: cumin, ground coriander, turmeric and garam masala, quickly followed by the pumpkin.
  3. Add the diced garlic clove, stir in.
  4. Serve hot on its own, with rice, an Indian bread, chutneys and freshly picked herbs from your garden, like parsley or coriander, torn and sprinkled over the top.

IMG_3989.JPG

Pumpkin Dahl 

(Serves 4)

– 1 onion, finely sliced – 1 tsp ghee or oil for frying – 1 tbsp mustard seeds – 1tbsp nigella seeds – 1 tbsp fenegreek seeds – 1 handful curry leaves – 1 tsp cumin – 1 tsp ground coriander – 1 1/2 tsp ground turmeric – 1 1/4  tsp ground garam masala – 300-400g roasted and food-processed/ raw, grated pumpkin – 1 large garlic clove, diced – 250g red split lentils -Boiling water from the kettle – Rice, chapatti, popadom, naan or a mixture, to serve – Freshly cut coriander and parsley, to serve

  1. Oil a large frying pan. Peel and slice the onion into thin strips and place in the pan. Heat high for a few minutes before turning down to simmer, stirring the onion. Let the onion simmer to a golden brown before adding the mustard seeds, nigella seeds, fenegreek seeds and curry leaves, stirring in the ingredients to combine. Allow the contents of the pan to simmer for a few minutes to absorb the flavours.
  2. Add the other spices: cumin, ground coriander, turmeric and garam masala, quickly followed by the finely grated pumpkin. Place a pan lid over the top of the frying pan and leave until the pumpkin is slightly cooked. Lift the lid occasionally to stir to encourage the ‘sweating’ of the vegetables.
  3. Add the diced garlic clove, stir in.
  4. Meanwhile, boil a kettle of water. Put the red lentils into a glass or other microwave dish, large enough to hold all of the contents of the Dahl. Scrape the contents of the frying pan into the dish along with the lentils, followed by the boiling water, enough so that it is covering the ingredients. Stir to combine.
  5. Place a lid over the top of the Dahl and microwave for 15 minutes before checking and stirring. If the lentils have absorbed all of the liquid, it is ready. It will probably need around half an hour before this happens. If the lentils look too dry, add a dash of more boiling water.
  6. Serve hot on its own, with rice, an Indian bread, chutneys and freshly picked herbs from your garden, like parsley or coriander, torn and sprinkled over the top.

IMG_3964.JPG

Pumpkin Cake with Citrus Cream Cheese Sauce

Originally a River Cottage Veg Patch Cupcake recipe from a free booklet that came in my grandma’s paper. This is the first year I altered it slightly by making it into a Victoria sandwich styled all in one cake rather than individual cupcakes – it was little quicker and 12 pumpkin cupcakes can be hard to shift sometimes. The great thing about this recipe is that you really don’t know that there is pumpkin in it. I didn’t tell my family what the magic ingredient was the first time I made the cupcakes and they could not tell. Even my brother eats it and he is not the most ardent vegetable lover, let along pumpkin lover. Best cake to use a pumpkin in and the cream cheese icing is the perfect compliment. Who knew that citrus and pumpkin were such a lovely match? I also increase the amount of pumpkin…

A little note about the cream cheese sauce/icing: you might want to halve it as I always have too much but I just offer it as an addition as most people like to put extra with their slice. Also, mine never seems to set into icing hence why I have called it ‘sauce’. Looks prettily/spooky when it runs down the sides anyway…

Edit: After reading into it, I now know that the icing insists on using full-fat cream cheese otherwise it doesn’t set. I did use full-fat but very cheap stuff. So if you make this icing, go for full-fat, EXPENSIVE real cream cheese!

(Serves 10)

– 200g self-raising flour -1 tsp baking powder  – 3 medium sized eggs – 175g caster sugar – 300g roasted pumpkin – Finely grated zest of 1 lemon

For the cream cheese filling and topping: – 100g full-fat cream cheese – 25g butter, softened – 170g icing sugar – Finely grated zest of 1 orange

  1. Preheat the oven to 180C. Line two 20cm sandwich tins with baking parchment.
  2. In a food processor, whizz the roasted pumpkin so it is finely grated.
  3. Beat the eggs and sugar together in a large bowl using an electric whisk until the mixture is thick, creamy and pale.
  4. Fold in the flour and baking powder. Scrape the pumpkin out from the food processor and fold in, followed by the lemon zest.
  5. Spoon the mixture into the cake tins evenly and smooth down the surfaces. Bake in the oven for 30 minutes or until lightly golden and springy to the touch. Insert a cake skewer into the centers to check that they are done. If it leaves clean, they are ready. Leave the cakes to cool in their tins for at least ten minutes before turning them out onto wire racks to cool completely. This is very important as the icing will run if spread on the cakes when they are too hot.
  6. To make the icing: beat the cream cheese and butter in a large bowl using an electric whisk until the mixture is smooth.
  7. Add the icing sugar and zest. Beat until it is very light and creamy. The mixture should be slightly thickened. If it is not, add a little more icing sugar and mix in well. Cover the bowl with a plate or cling-film and refrigerate for at least 1 hour before use. This is also important as it needs to be thickened or it will continue to run off the cake.
  8. Once the cake is completely cool and the icing has been left to chill, turn one cake upside down on a serving plate and spread half of the cream cheese icing over the base. Place the other half of the cake upright on top of the iced sponge. Ice the top of the other half, spreading and smoothing it over the surface carefully.
  9. Serve cut into slices. It should keep for about 3-4 days in an air-tight container.

IMG_3982.JPG

IMG_3967.JPG

IMG_4010.JPG

Recipe: Raspberry Jam

IMG_2755

Raspberry jam is the ultimate popular staple in our household. We love it on toast, with scones, hot cross buns, in Victoria sponges… It is a lovely ruby red, sweet delicacy. Raspberries have a low pectin content and will nearly always needed added pectin to help it set. Some people like to use jam sugar with added pectin, some like to make their own pectin. I resort to liquid pectin that can be bought in bottles from most supermarkets. I purchase Certo’s liquid apple pectin which works really well. Chuck it in at the end once you have turned off the heat and enjoy. Try it in my Jam Roly Poly recipe, coming soon…

IMG_3579.jpg

Raspberry Jam 

(Makes 2.25kg)

– 1kg raspberries – 1kg granulated sugar – Juice of at least 2 lemons – 125 ml liquid pectin

1. Put the raspberries in a large pan over a high flame. Add the sugar and lemon juice, stirring in.

2. Stir over a high heat and then allow the fruit to stew, checking the temperature with a jam thermometer. When it has reached boiling point, allow it to bubble furiously for at least ten minutes, stirring occasionally.

3. Meanwhile, put a china plate inside the freezer so that it is cold. Spoon a small dollop of jam onto the plate and put it back in the freezer for a minute. Take it out and run a fingertip straight through the middle of the jam splodge on the plate. If the jam ‘crinkles’ and leaves a trail as you push your fingertip through, then it is done. If it doesn’t, continue to boil the jam and check to see if it is improving. Once it is nearly done, turn of the heat. Pour the liquid pectin into the pan and stir in. Check the pectin test again to make sure that it is setting. Allow the jam to cool slightly, for probably at least half an hour.

4. Once done, bottle in sterilised jars (place wax discs over the surface to preserve it longer before putting the lid on) and store in a cool, dry place overnight, allowing it to set. You can use the jam from the next day onwards.

IMG_3581.JPG

IMG_3590.JPG

IMG_3483.JPG


Raspberries

IMG_2755.JPG

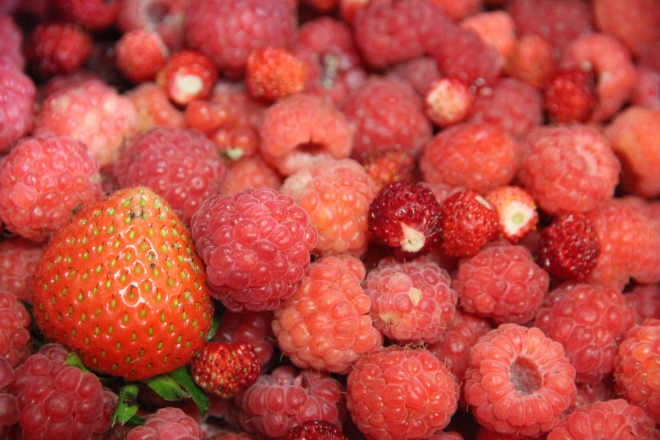
Raspberries, Rubus, are of the rose family. They are a widely commercial fruit crop, grown in all temperate regions across the world. Many of the modern commercial raspberries are hybrids of Rubus ideaus and Rubus strigosus. Recent breeding has resulted in thornless cultivators that stand upright strongly without the need of staking.

They are believed to have originated from Eastern Asia. Archeological evidence has shown us that Palaeolithic cave dwellers consumed raspberries and that the berries have been part of the human diet for centuries although the canes were not cultivated until about the 4th century. Raspberries were associated with fertility and in Greek mythology, raspberries were white until Zeus’ nursemaid, Ida, pricked her finger on a thorn and stained the berries red. Rubus ideaus translates as ‘bramble bush of Ida’. During the 13th century, the juice of the berries was used to stain artwork red.

The black raspberry is Rubus occidentalis with a distinctive flavour. Purple raspberries are hybrids of red and black types. They can be found wild in a few places, such as Vermont. A blue raspberry is a cultivator called ‘Columbian’, a hybrid of a purple raspberry, black and red. There are about 200 different species of raspberries in total. Raspberries have also been crossed to create the wonderful boysenberry and before that, the loganberry. My gran gave us a loganberry last year and we purchased a boysenberry plant this year after discovering ‘Bunny Loves: Boysenberry Jam’ when on holiday in Dorset a couple of years ago.

IMG_2429.JPG

Raspberries are grown for their fresh fruit market and their ease at being frozen, pureed, dried and made into wonderful conserves. Traditionally they were a midsummer crop but due to cultivation and travel, they can be obtained all year round. We often start picking our own around June until late autumn, often coinciding with the frosts.

Raspberries need ample sun and water and thrive best in a soil pH 6-7.

Raspberries are a rich source of vitamin C, 26g per 100g serving, and dietary fibre, 6% total weight and one of the highest recorded in whole foods.

Raspberry leaves can be dried and used for a flavoured tea that can soothe the digestive system and ease cramps. There was a time when the leaves of the raspberries were values higher than the berries due to their medicinal uses.

Raspberries have long been associated with herbal remedies. Today, we recognise cancer and heart disease fighting properties within these berries, notably ellagic acid. Raspberry tea is recommended to women after childbirth to ease pain, a mouthwash can be made including raspberries that prevent gum bleeding and the tannins in dried raspberry leaves can soothe sunburns and other minor burns. Raspberries also contain antimicrobial properties that can inhibit Candida albicans, a trigger for IBS. Like strawberries and other dark berries, raspberries fight macular degeneration and promote healthy eyesight.

The biggest threat to your raspberry fruits will be birds. If you have a severe issue, netting or bird scarers are the only defence. We fortunately have so many, our birds seem to run out of steam and target the strawberries, blackcurrants and redcurrant bushes more often. As far as diseases are concerned, raspberries can develop severe root rot from an overly-wet ground that can destroy the plant itself. You want to make sure the raspberry is well-watered when it is fruiting but is planted in well-drained soil to prevent this tragedy from happening – otherwise you will be forced to get rid of your plants and start again and Verticillium wilt can stay in the ground for years at a time.

IMG_2418.JPG

Raspberries are usually sold as dormant bare-rooted canes. Plant them 45 cm or so apart in well-fed soil in rich, rotted, organic matter. Leave 2 metres between rows of summer-fruiting varieties and 1 metre for winter-fruiting varieties. Raspberries are shallow rooting so resist planting them too deeply. Summer raspberries produce fruit on canes that grew the year before so do not expect any produce the first summer. Each cane fruits only once so remove the old canes after harvest is over to leave room for new ones to grow. If the canes flop over, tie them to bamboo sticks or some other prop to hold them up and make them easier to pick (we finally did that this year and it is making it a lot easier for us, and regrettably most likely the birds too, when harvesting them). Autumn raspberries ripen their fruit on the current year’s canes so they will not produce anymore the next year. Raspberries are very good at spreading suckers and creating new plants, hence why we have so many which we are very pleased about! If you do not want to extend your crop, pull up the baby plants as the sprout. It is recommended to replace your raspberry plants at around ten years. If you are considering growing one in a container, autumn varieties are smaller and are more suitable for you.

IMG_1252

Summer raspberries should be ready for picking from mid-June to August and autumn varieties will ripen from August to October. Keep an eye on them as they ripen and mould quickly. Keep picking as it encourages more growth from the plant. They are delicious eaten fresh but we almost always have a glut which I am happy about as I freeze them and make them into our ever-popular raspberry jam. Otherwise, I am happy to use frozen raspberries in baking, such as cakes.

Fresh raspberries can be eaten on their own, with yoghurt or ice cream, whipped in cream to make a fool, baked in a crumble, tart or pie, made into a fruit leather, bottled for preserving or juiced with apples or blackberries for a drink.

I start the raspberry recipe collection with my latest discovery, Nigella Lawson’s lemon and raspberry muffins (‘How to be a Domestic Goddess’). 

Lemon and raspberries pair quite nicely together. I would try replacing the raspberries with blueberries when they are in season, or bilberries if there are any ready for picking now. Happy baking!

IMG_2876.JPG

Nigella’s Lemon-Raspberry Muffins

(Serves 12)

– 60g butter – 200g plain flour – 2 teaspoons baking powder – ½ teaspoon bicarbonate of soda – 150g caster sugar – ¼ teaspoon salt (omit if using salted butter) – Juice & finely grated zest of 1 lemon – Approximately 120ml milk – 1 large egg – 150g raspberries

1. Preheat the oven to 200C and line a muffin-tray with 12 large paper cases.

2. Melt the butter in the microwave or in a pan over a medium flame. Set aside.

3. In a large bowl, stir together the flour, baking powder, bicarb, sugar, salt (if using it) and the lemon zest, finely grated.

4. In a measuring jug, pour in the lemon juice, then enough milk to reach  the 200ml mark. Beat in the egg and melted butter.

5. Pour the wet ingredients into the bowl of dry ingredients and stir briefly , until just combined. Fold in the raspberries gently.

6.Spoon the mixture into the muffin cases and bake in the centre of the oven for about 25 minutes. When cooked, the tops should spring back to your touch and be golden coloured. Leave in the tray for about ten minutes before turning them out onto a wire rack to cool completely. Store in an airtight container.

IMG_2878.JPG

IMG_2884.JPG

IMG_2889.JPG

IMG_2891.JPG