Salad – Spinach


IMG_2085.JPGI better admit it now: I am a big fan of spinach. I eat it pretty much daily, it is my favourite green leaf. I tried it once with houmous slathered thickly on a crust of warm, homemade whole-wheat bread. It became a lunch time favourite and I have not looked back since. It goes very well with lots of meals, raw or cooked (I prefer it raw). Luckily, spinach is easy and quick to grow once you have got it going.

IMG_1037.JPG

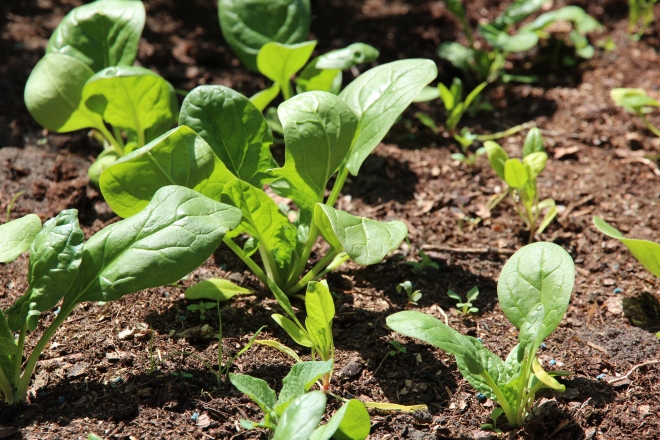
Last year I planted under the cover of fleece in March the varieties ‘Barbados’ and ‘Emilia’ (February-August sowing times). I did likewise this year with this variety as well as planting in March ‘Samish’ spinach (March-August) which germinated pretty well too.  These are really tasty varieties that I would recommend and should be ready to harvest within a matter of weeks once sown. The sudden heat has made a lot of mine bolt but they are still pickable and edible. I have just sown some more in my runner-bean trenches. When the leaves rot down, they are supposed to provide the beans with nitrogen and the beans in turn provide them with shade. They can be bought at Mr Fothergills, at least but you can find lots of popular spinach varieties everywhere.

Also, at the end of last year, in October we sowed some ‘Turaco’ (August-October) spinach indoors before planting it under the cover of fleece in a trench alongside some winter sown peas. This is a hardier type of spinach ideal for winter sowings. It has been ready to harvest since some time in April but have now bolted quite a lot now (still picking them, though). The leaves are big and dark green and deliciously prolific. It has been a joy to be able to harvest my own spinach again this spring and summer and not to pick up the guilty plastic bag of soggy green mush I usually slip into the trolley at the supermarket.

Sow spinach direct (or indoors before planting out), 2.5 cm / 1″ deep into prepared, fertile soil, allowing 30 cm / 1′ between rows. Keep  well watered and fed as they continue to grow and sow some more every couple of weeks, like you would do for radishes or spring onions, to ensure a continuous crop. If you are sowing outdoors, early sowings will need the protection of a cloche, fleece or a cold-frame. Harvest the leaves when they are around 3cm or so above ground level, to encourage more growth and when each plant has at least four leaves growing.

IMG_2124.JPG


Like lettuce, spinach can bolt but it does not taste as strong as poor lettuce does. However, when it bolts, the leaves become tiny and you have to pick quite a few to get a good bunch. Therefore, I would recommend adopting the successional sowing attitude and sowing perhaps a new bunch once a month or every couple of months, depending on how the weather is and what your needs are for fresh salad.

Other ‘spinach type leaves’ I have sown in the past include Swiss chard, a member of the same family, as well as most recently ‘Perpetual Leaf Beet Spinach’ purchased from the Real Seeds Company. I sowed these indoors and have recently planted them out between some purple sprouting broccoli with some radishes for extra companion planting points! They are doing quite well. I have not bothered sowing Swiss chard since I first planted it two years ago in August, I think. It has grown back every summer after dying off over winter and self-sown some babies every year. We have a lot this year, despite my mum digging some up for my sister’s fete this weekend. Swiss chard should only be eaten cooked otherwise it tastes gross. Treat it like you would kale or any other oriental green – rip of  the chunky stem that tastes quite strong and rip the leaves into little pieces before chucking them in a stew, stir fry or on top of a pizza or wilting it down for a side dish.

Spinach is considered to have originated from the Persia, or Iran. It found its way to China during the 7th century when the king of Nepal sent is abroad as a gift. It was brought to Spain by the Moors around the 11th century and was known in England as the ‘Spanish vegetable’ for some time. Compared to most vegetables, spinach is rather new. A sweet historical story is that spinach was the favourite vegetable of Catherine de Medici, alive in the 16th century who left her home in Florence to marry the king of France. She brought her own cooks with her so that they could prepare her spinach dishes just the way she liked them. Now, if a dish is prepared on a bed of spinach, it is called ‘a la Florentine’.

Nutritionally, spinach is high in vitamin K, A, manganese, folate, magnesium, high levels of iron, copper vitamins B1, B2, B6, E, C, calcium, zinc and potassium. Additionally, it is a good source of dietary fiber and omega-3 fatty acids. This mixture of nutrients gives spinach superb status in the antioxidant and anti-inflammatory department. However, due to the high oxalate content found in spinach, people are often concerned about consuming too much of this leafy green raw. Oxalates are naturally occurring organic acids found in a wide selection of foods that can interfere with our absorbing of calcium or, ironically, iron, the major nutrient spinach is famous for (thin Popeye). Oxalic acid binds with calcium, making it unusable in our bodies. However, oxalic acids are broken down when heated so steamed or sautéed spinach and when spinach is cooked, nutrients like vitamins A and E, the protein found in the green vegetable and other nutritional benefits are easier for our bodies to absorb. Some of the other nutrients, like vitamin C, folate, potassium, and others, are more plentiful for our bodies when we eat the spinach raw. The iron content does not change whether you decide to eat it cooked or raw. You will absorb the iron if you eat something rich in vitamin C alongside it so consider pairing it with other vegetables and fruits. To conclude, varying the way we eat spinach, sometimes raw, sometimes cooked will give us the full range of nutritional benefits.


IMG_2128.JPG

Try eating spinach raw with any salad or as a green in your humble lunch time sandwich. Another lunch time favourite of mine is to make a rice salad with spinach, lettuce and rocket, perhaps some avocado (which I hasten to add, I do not grow) or sauerkraut (which I have yet to try making myself). It is also delicious on top of a bowl of chili con carne, raw or cooked.

To cook it, add it in any dish like casserole, stew, curry etc. To cook it on its own, wilt the leaves of the spinach in a little butter over a medium heat in a frying pan. Serve with some additional falvourings if you would like: salt and pepper, chilli, ginger, soy sauce, sweet chilli sauce… Serve it alongside a baked potato with butter and cheese or swirl it in some rice with some cooked chickpeas.

IMG_2266

Salad – Radish

IMG_2145.JPG
‘Cherry Bella’, ‘Esmerelda’, ‘Polenza’

These little, colorfully red vegetables are quick and easy to grow, attributed as the ideal starting point for encouraging children to garden so that they do not get impatient!

Radishes are assumed to have first been grown wild in Southeast Asia, thousands of years ago. Ancient writings in Egypt suggest that they were cultivated before the pyramids were even constructed, suggesting that this little red vegetable has been around a pretty long time, developing over the years to become the little red vegetable we love today. In Ancient Greece, radishes were revered so much that gold replicas were made to impersonate them as an offering to the god Apollo. Radishes first appeared in England during the 16th century and are actually referred to in Shakespeare’s work in ‘King Henry IV’.

IMG_2139.jpg
Radish patch in April after being sown in February 2016

Radishes are a fast germinating and growing crop that can be sown in soils averaging 10C-18C. During the winter months, one must allow 6-7 weeks for the crop to mature but as the temperatures rise and the sun (hopefully) shines, you can pick your radishes less than a month after sowing. As the cycle of growing and harvesting is so quick, to have a continuous supply of radishes throughout the year they should be sown successionally every fortnight.

Radishes grow best in full sun with a soil PH 6.5-7.0, making it an ideal vegetable for my sandy soil. From my own experience, I have discovered that radishes become plumper and redder when sown in well-fed soil. I have planted them this year in ground that was used for potatoes last year that has been freshly fed with well-rotted manure and mulch and they have done marvelously. I am now sowing them between other vegetables as a catch-crop as they are an ideal companion plant (they have few pests, are small and quickly harvested and moved out-of-the-way from the other crops. This saves space in the garden rather than dedicating one large patch to them that they do not need. The only plant I have heard of that disagrees with radishes is hyssop).

Daikon or Mooli radish are winter oilseed radishes from Asia. These are long, white radishes instead of the small red ones we are used to buying in our local supermarkets. These varieties are important parts of East, Southeast and South Asian cuisine that are steadily becoming more popular in England as we branch out on our exotic vegetables with funny names.

12322z.jpg
‘Mooli’ or ‘Daikon’ Radishes (Image from Mr Fothergills website)

This year, I sowed my first lot of radishes in February under the cover of fleece. They were ready for picking by early April. Seed packets recommend sowing radishes from February to September, early and perhaps late sowings made under cover to optimise the health of the plant in case of frost damage preventing the growth.

The types I have grown recently are: ‘Cherry Bella’, ‘Esmerelda’ and ‘Polenza’. All of these have had the same taste, appearance and success in growing.

IMG_2146.JPG

Plant radishes 1/2 inch deep, 2 inches apart. Keep them well watered and fed to get a great harvest. If you do not water them regularly, the roots you want to eat will split and if they are not fed very well, they will not grow to a reasonable size. They can be stored in the ground and picked and used fresh from the garden but the longer they are left, the ‘woodier’ the texture of their skin will be. If this happens, cut them very finely or peel them, otherwise experiment with cooking them in a dish.

Radish roots are most often used in salads though the tops can be eaten too. They can be sautéed as a side dish or thrown in a stir fry to wilt. They are also often included in soups. Raw radish has a peppery taste (caused by glucoseinolates and the enzyme myrosinase combining when chewed) and a crisp texture, adding flavor and seasoning to your salads. ‘Veg Patch’, ‘River Cottage’, suggests using the peppery radishes in a raita alongside a curry: slice 200g radishes into a bowl. Combine 100g goats cheese with 300g natural yoghurt, a little at a time. Fold in the radishes and a couple or tsp of mint, if you would like, and season with a little salt and pepper. Eat it alongside a curry or use as a dip for naan bread, poppadoms or chappatis.

Radishes are a good source of fibre, vitamins C and B6, folic acid, potassium, iron (not so much, but a little), calcium, magnesium, copper and riboflavin.


Salad – Rocket


IMG_2150.JPG
‘Buzz’ Rocket

Rocket, or Arugula has a sharp, peppery taste. It is high in vitamins A and C. Rocket is popular in Italian cuisine because of its aromatic flavour. In Roman times, this green was grown for both its leaves and seeds. The seeds were used for flavouring oils which is still practiced today.

Rocket is quite easy to grow: it germinates efficiently and quickly. It can be sown all year round if you start them off in containers indoors during the colder months and plant them out under the cover of horticultural fleece, cloches or cold frames. Their only real pest concern are slugs and snails.

However, rocket does tend to bolt and flower before you are ready for it to do so. Once this happens the delicate, tender leaves you were once eating become a bit stronger and the tougher. This is fine for some people but displeasing for others. When this happens, you can included these leaves in cooking instead of eating them raw if you do not like the taste – the leaves will just be a little hotter than the new, younger ones.

To avoid this, sow little and often, successional sowings. I am on my third sowing this year since February. I started the first batch off indoors and they germinated really quickly, in a couple of days. I am still picking them but they are starting to flower (you can eat these flowers, include them in salads or a stir fry). My second sowing I made outdoors under the cover of fleece when temperatures were still low in March. These took about a week or two to germinate because of the cold. My third sowing I did a couple of weeks ago indoors just before the temperatures rocketed to 20C daytime and an average 12C at night. These I will plant out shortly when they are big enough, perhaps in a couple of weeks.

Types of rocket I am growing this year are ‘Buzz’, ‘Monza’ and ‘Tirizia’. These can be grown indoors nearly all year round and then sown outdoors from March until the end of August, perhaps under the cover of a cold frame or fleece in the early months when frost is still about. These have all been delicious and easy to grow and transplant.

Rocket, spinach and watercress is a green salad made in heaven. Try adding this mix to your sandwich at lunch.

Another way I love eating rocket is with one of our ‘lazy family suppers’ when the idea of cooking anything extravagant is just exhausting: Pasta and Tinned Tomatoes. The rocket adds an extra classy flavour and makes it oh-so Italian – and it could take you no longer than half an hour to prepare on your own, tops.

IMG_2310.JPG

Pasta and Tinned Tomatoes

(Serves 6)

– 250g pasta – Olive oil – 800g tinned tomatoes – 300g cheddar cheese – 400g peas – 80g pine nuts – 6 large handfuls of rocket

  1. Bring a large pan of water to the boil. Add the pasta and turn the heat down to simmer for ten minutes or until the pasta is cooked. Drain and drizzle olive oil over the top, stirring it in. Set aside.
  2. Put the tinned tomatoes in a saucepan and bring to the boil. Remove when hot. Meanwhile, grate the cheddar cheese.
  3. Bring another pan of water to the boil. Add the peas and leave to cook until heated and ready.
  4. Place a frying pan over a high heat. Add the pine nuts and stir in the dry dish. Once they start to brown, remove from the heat immediately and continue to stir the nuts over the very hot dish for a couple of minutes.
  5. Serve: place pasta on a plate, scrape tinned tomatoes over the top, scatter cheddar cheese on top followed by the toasted pine nuts and fresh rocket before adding lots of peas on the side.

IMG_2314.JPG

IMG_2319.JPG

IMG_2321.JPG